Why a Running Toilet Is Worth Fixing Right Away
That persistent hiss or trickle coming from your toilet isn't just annoying — it's a measurable drain on your water bill. A running toilet can waste hundreds of gallons per day without anyone in the house noticing until the next utility statement arrives. Because the leak happens inside a sealed tank rather than on the floor, it's easy to ignore.
The good news: the vast majority of running toilet repairs cost less than $20 in parts and require no specialized skills. If you're already thinking about where surprise household expenses fit into your monthly spending, see how to build a practical household budget to account for small repairs before they become big ones.
Getting comfortable with basic plumbing repairs is also one of the habits that separates confident homeowners from reactive ones. Good repair habits — like diagnosing before buying parts — apply here just as much as they do to bigger projects.
What's Inside the Tank and What Each Part Does
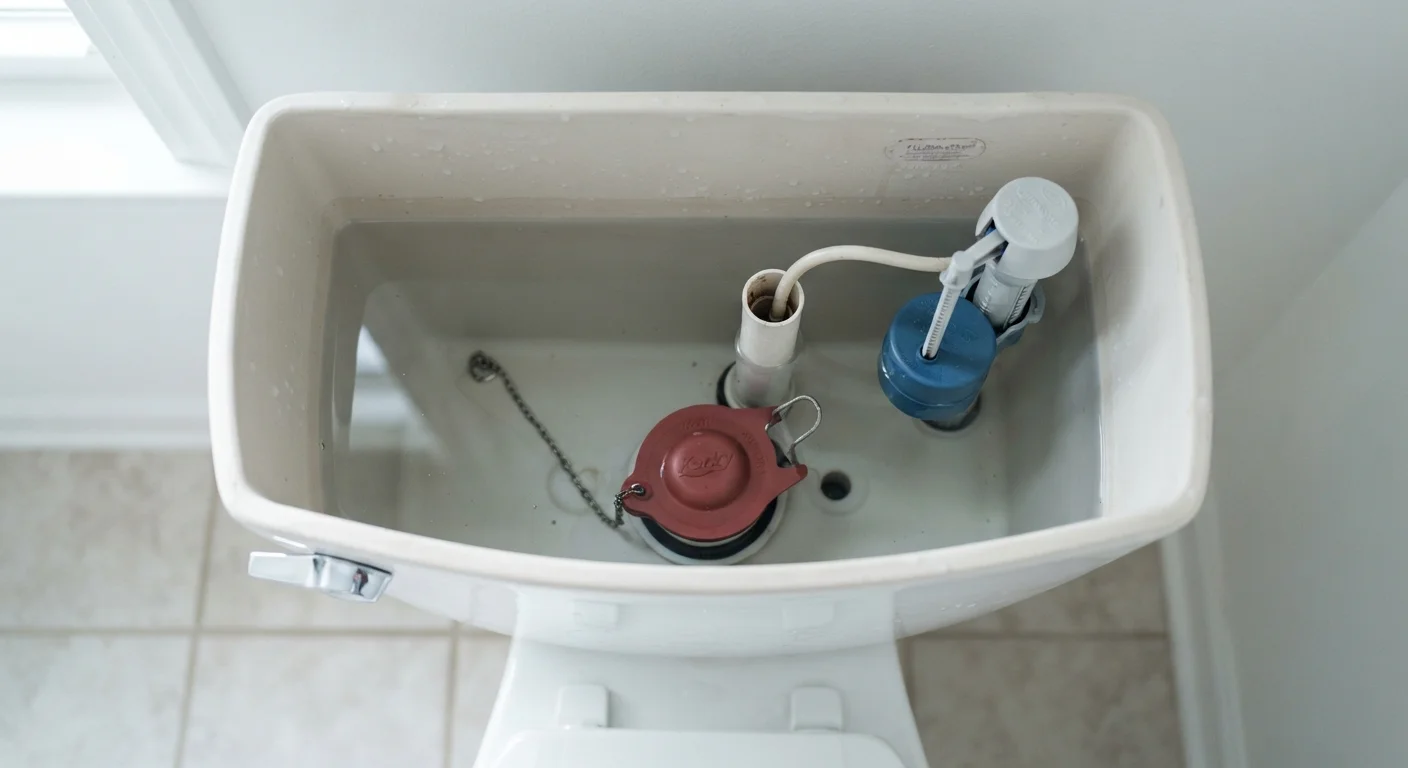
Before lifting the tank lid, it helps to know what you're looking at. A standard toilet tank contains three main components that work together every flush.
Flapper
A rubber seal inside the toilet tank that opens during a flush and closes to allow the tank to refill. When it wears out, it lets water slowly leak into the bowl.
Fill valve
The valve that controls water flowing from your home's supply line into the toilet tank. It shuts off automatically once the tank reaches the correct water level.
Float
A buoyant device connected to the fill valve that rises with the water level. When it reaches the set height, it signals the fill valve to stop filling.
Overflow tube
A vertical open tube inside the tank that acts as a safety drain. If the water level gets too high, water flows down this tube and into the bowl rather than overflowing the tank.
Supply valve
The shutoff valve located on the wall or floor behind the toilet that controls water flow to the toilet. Turning it clockwise stops water from entering the tank.
- The flapper is a rubber seal that sits over the drain hole at the bottom of the tank. When you flush, it lifts to release water into the bowl, then drops back down to seal the tank for refilling.
- The fill valve (sometimes called a ballcock) controls the flow of water from the supply line into the tank. Once the tank reaches the correct water level, the fill valve shuts off.
- The float is the device that signals the fill valve to stop. On older toilets it's a ball on an arm; on newer models it's a float cup that rides up and down the fill valve shaft.
When any of these parts fails to do its job fully, water either leaks out through the flapper or overflows into the bowl through the overflow tube — and the fill valve keeps running trying to compensate.
Diagnosing the Problem Before You Touch Anything
Resist the urge to start replacing parts at random. A two-minute inspection usually pinpoints the cause, saving you an unnecessary hardware store trip.
- Remove the tank lid and set it safely aside. Look at the water level. If water is spilling into the overflow tube (the tall open tube in the center of the tank), your float is set too high.
- Perform the food coloring test. Add a few drops of food coloring to the tank water. Wait 10–15 minutes without flushing. If colored water appears in the bowl, your flapper is leaking.
- Listen and watch after a flush. The fill valve should shut off once the water reaches the marked fill line (usually about an inch below the top of the overflow tube). If it keeps running or cycles on and off repeatedly, the fill valve itself may be worn.
Write down or photograph what you observe. Knowing exactly which part is failing before you visit the hardware store means you'll buy the right replacement the first time.
How to Fix the Three Most Common Causes
Once you've identified the culprit, the repair is usually straightforward. Here's how to address each one.
Worn or warped flapper
Turn off the water supply valve behind or beneath the toilet. Flush to empty the tank. Unhook the old flapper from the pegs on either side of the overflow tube and detach the chain from the flush handle arm. Take the old flapper to the hardware store to match the size, or buy a universal replacement. Snap the new flapper onto the pegs, attach the chain leaving about half an inch of slack, turn the water back on, and test.
Float set too high
If your float is a ball-and-arm style, bend the arm slightly downward so the ball sits lower, shutting off the fill valve before water reaches the overflow tube. If it's a float cup style, pinch the adjustment clip and slide it down the fill valve shaft. The water level should sit roughly one inch below the top of the overflow tube.
Faulty fill valve
If adjusting the float doesn't help and water continues running, the fill valve itself likely needs replacement. Shut off the supply valve, flush to drain the tank, and use a sponge or towel to remove remaining water. Disconnect the supply line from the bottom of the tank, unscrew the fill valve locknut, and lift the old valve out. Install the new valve per its instructions, reconnect the supply line, and turn the water on slowly to test.
Take the old part with you to the store
Toilet flappers and fill valves come in multiple sizes and styles that aren't always interchangeable. Bringing the worn-out part to the hardware store is the simplest way to find a compatible replacement and avoid a second trip.
For a broader look at which DIY repairs are genuinely worth attempting yourself, see common DIY repair myths that can cost you more in the long run.
When to Call a Plumber Instead
Most running toilet repairs fall well within a first-timer's ability. However, certain situations warrant professional help rather than DIY troubleshooting.
- Cracks in the porcelain — tank or bowl cracks can worsen unexpectedly and cause water damage to floors and subflooring.
- Corroded or leaking supply connections — if the supply line fitting or shutoff valve is visibly corroded or fails to close fully, a plumber should assess whether parts need replacing.
- Tank bolt leaks — water seeping from the bolts connecting the tank to the bowl often indicates worn washers, but accessing them can be tricky and risks cracking the porcelain if overtightened.
- Repeated failures — if you've replaced the flapper and fill valve and the toilet still runs, there may be an underlying issue with the toilet's design or the home's water pressure.
Knowing when not to push further is just as valuable as knowing how to fix something. If you're unsure, getting a professional opinion before attempting further work is always a reasonable call. For context on where DIY has clear limits, separating DIY myth from reality is a useful next read.